 |
| Before: Unflattering frills! |
 |
| Before: Built-in beads |
It had a nice, Spring-y floral feel, but the added chest frills, too-short under slip, and built-in beads didn't belong in any season. So I tried to make this a bit more practical. Armed with my strawberry lemonade and Netflix, my self-care Sunday commenced.
 |
| Strawberry lemonade and Last of the Mohicans |
The first things to go were those 4 strings of chest beads.
.JPG) |
| Beads |
Next I had to tame those chest frills. Removing them completely wasn't a good option because underneath looked too thin and plain. Instead, I pinned and sewed them down at the bottom edges.
 |
| Sewing down the frills |
I liked the way this framed the bust of the piece.
 |
| Sewn down frills |
Next, I took a long strip of blue scrap material I had handy and sewed it at the waist seam between the top of the piece and the skirt. I chose blue because it matched some of the little blue flowers in the skirt and provided some nice contrast to the pale yellow.
I first sewed the top of strip upside down to hide the seam.
 |
| Upside down blue strip |
Then I flipped the strip down and sewed the bottom.
 |
| Sewing the bottom of the strip |
The dress was too long to be a shirt, but too short to comfortably be a dress, so I decided to go the shirt route and cut about 6 inches from the bottom of both layers of the dress.
 |
| Cut cut cut! |
I folded and sewed new bottom hems for the under slip and the outer shell. I also took the outer shell in a bit on both sides.
I like when I can utilize most of my project materials, so I grabbed 2 of those strings of chest beads and a piece of thin elastic.
 |
| Beads and elastic |
I sewed one end of the elastic to the ends of both strings of beads.
 |
| Bead ends sewn to the elastic |
Then I fitted it around my head, cut the elastic, and sewed the other ends of the beads and elastic together.
Wham, bam, homemade headband!
 |
| Beaded headband |
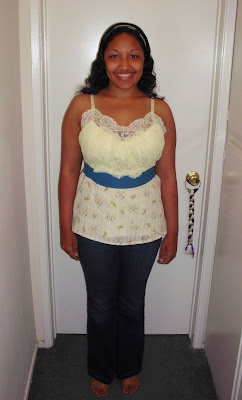
After taming the frills and re-purposing the chest beads, I had a new, fresh piece that was a little more practical and fashionable than before. Here's a reminder of before:
 |
| Before: Frilly beaded floral dress |
And here's the new look:
 |
| After: Less-frilly floral shirt |
 |
| After: From behind |
Plus the headband!
 |
| After: Beaded elastic headband (and super straight hair part!) |
I doubt this will be a keeper for my closet, but I think it's a good upgrade for whoever wears it next! And it's nice to finish a project I started over half a year ago :)
I hope there is some more rain on the forecast soon. I'd like to have at least one more chance to cozy up with my blanket and some hot cocoa before it's time for popsicles and swimming pools!
And I'm REALLY excited about the next transformation on my list. Here's a sneak peek:
 |
| Next time on New Dreams for Old Seams.... |
Until next time, blessings.
No comments:
Post a Comment