Monday, June 24, 2013

#42: Teal Turtleneck

What. A. Weekend. I had fun celebrating my anniversary at Universal Studios, but was also woken Sunday morning to some awful news that has still got me asking, "Am I dreaming? Did yesterday really happen?" I'm so glad I have God's truths to hold onto while I try to figure out what the heck happens next. Step by step....

Gratefully, I was able to take some time to focus my energy on a project yesterday. It was like my calm within the storm.

I found this teal turtleneck at a local thrift store a few months ago for a buck. But, as you can see, I was swimming in it! Let's see how I took this from swimming in the stormy sea of my weekend to dry land.


Before: Teal Turtleneck

Before: From behind

The first thing I did was chop off the sleeves between the base of the neck and the underarm area.


Chopped off the sleeves


Next, I folded, pinned, and sewed a new hem around each arm hole.

Then I flipped it inside out, tried it on, and carefully pinned the sides to reduce some of the bollowy-ness and the gaping arm holes. I carefully took it off, sewed the sides up where I had pinned, and cut off the excess. I also sewed about an inch of width off of the turtle neck.


Cutting off some of the side material


To keep the edges neat, I did a fake-serge on the edges I had just cut: I laid the cut edge under the center of my presser foot, and zig-zag stitched all the way down, wrapping one side of the zig-zag around the edge of the cut material.


Sorry so blurry!


Once I had adjusted the size on the sides, I pinned and sewed a dart on each side of the bust so it wouldn't gap at the bust.


Pinned dart

Sewn darts


 Time to add some pizazz! Inspired by another shirt I have, I cut 5 long strips of various lengths off of the sleeves in this shape:


Not sure what this shape is called


I had read about lettuce-edging online, and thought this would be a good project on which to try it out!

I chose the zig-zag stitch on my sewing machine, and did the same thing I had done with the fake-serge in that I lined up the rounded edge in the center under my presser foot, and sewed a zig-zag stitch around the edges, but I also stretched out the material as I fed it through.


Stretching and lettuce-edging

As you can see, when the material is stretched, it comes out on the other side with a wavy pattern.

Once I had lettuce-edged the rounded side of each strip, I arranged and pinned each of the strips down the front of the shirt starting at the collar.


Pinning lettuce-edged strips

Pinned lettuce-edged strips

 I sewed down the straight, pinned edge of each strip and cut off any excess material.

And I was done!


Here's the swimmingly-bland before photo again:

Before: Teal Turtleneck

 And here's how I kept my head above water:

After: Sophisticated Teal Turtleneck

After: From Behind

So there you have it! With this storm analogy, I am reminded of the Bible verse I taught years ago in Sunday school:

"Therefore everyone who hears these words of mine and puts them into practice is like a wise man who built his house on the rock. The rain came down, the streams rose, and the winds blew and beat against that house; yet it did not fall, because it had its foundation on the rock." ~Matthew 7:24-25

***God, please help me to keep my foundation on You so that I can weather this storm. Amen.***

Until next time, blessings. 

Monday, June 17, 2013

#41: Industrial Dress

Hello!! Welcome (or welcome back)! I've been SO busy this week planning for my husband's birthday (I tried my best to make him a decked-out Legends of Zelda cake. Yum!), and anniversary tomorrow *awwww <3*, plus work and every day living in between!


8-bit heart container, rupees, tri-force

Somewhere in the ruckus I found a moment to sew. I found this awesome dress at a thrift store for just a couple of bucks.

Before: Industrial Dress

Before: From Behind

I was really digging the pattern. It felt very industrial, like pipes and tubes with pops of color. Kind of reminded me of Tetris with all those L-shapes :) But the amount of pattern was a bit overwhelming in dress form. Plus, it had a nasty stain on the front, and the shape wasn't doing me any favors :P

Out, out darn spot!

So I  found a simple way to work it out.

First I removed the side belt loops.

Belt loops be gone!

Next I separated the top from the bottom skirt portion with a seam ripper.


"For my next trick I'm going to saw this dress in half!" *Gasp!* *Ooh* *Aahh*

After that I pinned and sewed a new hem around the waist of the skirt, making sure to accommodate the zipper.

Pinning and sewing

Finally, I sewed the sides to take it in slightly (though I will have to take it in a little more, as it's still a little loose, but I was in a rush).

Before you know it, I'm in a newly stylized outfit with just enough pattern to be cool, but not overwhelming.

Here's the before photo again:

Before: Industrial dress

And here's the new look!

After: Industrial skirt

After: From behind

I think a lot of the transformation has to do with the accessorizing. The thick belt not only accentuated the waistline that was non-existent in the original dress, it also kept everything in place since the skirt was still a little too big.

I enjoyed a night out volunteering at and watching a spectacularly-moving performance on themes of evolving through grief and loss at my dance studio, followed by Asian dinner with good company :)

I hope you liked this one. It's definitely a keeper in my closet!

Until next time, blessings.

Monday, June 10, 2013

#40: Leather Rocker Bracelet Copycat

I'm excited for today's post, as I made it for my man!

So my husband and I have been a couple for almost 10 years (wow!). Over the years, I have supported him through many changes in his style, from baggy button-up dragon shirts, to chain pants with braided hair, to jeans and a t-shirt with a shaved head. Now, he's starting to get into more of a rock style with stretched ears and rocker jewelry.

His birthday is coming up soon, and he's really hard to shop for. He's been eying this leather bracelet online, but hasn't bought it because all the reviews say it's super smelly (check it out on Amazon here).


The Inspiration: Leather Rocker Bracelet


Inspiration: The back


Inspiration: Open

I decided that I'd give it a try to see if I could make him a copy-cat bracelet without the smell or the price!

I didn't know how this would turn out, so I didn't think to take lots of process pictures. Sorry.

First, I made a trip to JoAnn's to find some fabric. They don't carry leather, so I got some of the best synthetic material I could find with my 40% off coupon :)

I sewed 2 layers together in a rectangular shape with rounded edges.

Rounded Pleather Rectangle

I then gathered a binder clip, some flat push pins, and 3 small belt buckles my friend sent me in a sewing package a few months ago (thanks A.S.!).


Binder clip, small belt buckles

Flat push pins

I sewed 2 long, thin, double-sided strips and 2 medium ones (I found the material stuck to the metal of the presser foot on my sewing machine, so I ended up placing a piece of paper over the fabric, sewed through the paper, and simply ripped it away. No more sticking!). My husband wanted the ends to be pointy, so I sewed and cut the ends of the strips to a point.

I connected the 2 medium strips by looping the binder clip between them. Then I sewed each of the ends of all 3 strips into 3 different belt buckles.

Next, I strategically pushed the push pins through the strips to match the original. Then I bent them so they wouldn't poke through (I did something similar with brads on this purse I made back in January, but I couldn't find any silver brads at the store, and don't have a rivet presser, so push pins were the next best thing).

I sewed each strip in place onto the rectangular base, and voila! I was done!

Here's how the original Amazon version looked again:

The Inspiration

Inspiration: the back

Inspiration: Open


And here's my wonderful husband modeling the copycat bracelet:

After: Copycat Rocker Bracelet

After: the back

Here it is up close:

After: Up close

After: the back

After: Open

Happy birthday Honey!! I'm glad I could custom-make you something you like!

And I hope you readers like it too! It's fun to post something a little different from my usual feminine clothes.

I hope you all have a fantastic, enjoyable week! Thanks for reading!

Until next time, blessings.

Saturday, June 8, 2013

#39: Brown Lined Dress Shirt

Hello again! I made the project for today's post last week, but haven't had time to write a post for it, so here it is!

I found this brown dress shirt at the thrift store a few months back for about $1.

Before: Brown lined dress shirt


Before: from behind

I liked the shirt, especially the lined strips of brown fabric coming down the front, but overall it was pretty boring. So I got creative and jazzed it up a little.

First, I decided to play up the lines.....on the back! I flipped this piece around so the buttons would be on the front.

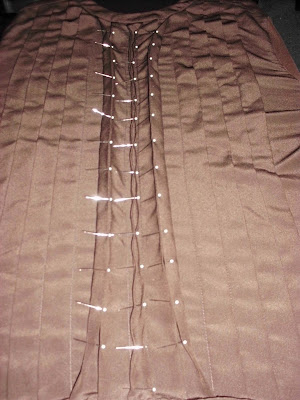
Next, I laid the shirt down lined-strips facing up, and began measuring and pinning spaces the all the way down center strip about every 3 inches apart.

Measuring and pinning

Then I folded the center strip and pinned it together at each spacing. I then took the next 2 strips on either side and pinned them together at the same spacing.

Pinning more strips

Next,  I sewed the  strips together at each point where a pin was, using a zig zag stitch with the feed dog dropped (the part that pulls the fabric through the sewing machine) so the fabric wouldn't move.

Stitching

I did the same procedure with the remaining strips on both sides, 2 at a time, until all were sewn together at the pinned points about 3 inches apart. The sewing machine was taking too long and using too much thread, so I ended up hand-sewing the last fourth of the stitches.

Lots o' stitches, lots o' rows

After all of those stitches (it actually took a pretty long time!), I opened up the space between the stitches, pulled together the fabric from half-way in between each stitch, and sewed it across each row space to the opposite row. This gave all the rows an accordion-like feel full of diamond shapes. Maybe the picture will make more sense.


Add caption

I tried to iron them to lay flat, but it didn't work. Oh well.

I took the shirt in a bit on the sides and under the arms, and I sewed the big sleeve cuff slits closed. I put it on backward, tucked in the cuffs to give it more of a jacket feel, and I was set!

Here's what it looked like again before:

Before: Boring brown lined dress shirt

And here's the after:

After: from the front


After: From behind

I liked the front more open, and liked that I had an unexpected surprise on the back as I walked by!

I imagine that when I get tired of this, it may make another good transformation into a decorative pillow ;)

I hope you liked it! I'm really excited for a few new pieces I just picked up at the thrift store. Can't wait to get my hands on them!

Until next time, blessings.