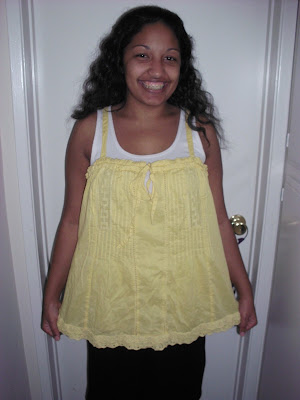
The weather in Los Angeles area has been really nice the past few days. It definitely feels like Spring is just around the corner. This springtime weather deserves a springtime remake. Enter this too-big yellow top I found at a local thrift store for about $1.
.JPG) |
| Before: Yellow shirt |
.JPG) |
| Before: Yellow shirt |
.JPG) |
| Before: From behind |
I'm not quite sure how this was supposed to fit. Maternity maybe? Or perhaps it was just supposed to be spacious. Either way, it was not working as a top for me. But I liked the patterns and envisioned wearing it a little lower.
First I ironed the shirt. Then I removed the shoulder straps.
 |
| Removing the straps |
Next, I pinned the center gap between the drawstrings and sewed the gap until about an inch from the top of the shirt.
 |
| Pinning the gap |
I carefully separated the top seam and removed the drawstrings. The back of the shirt had elastic in it, so I opened the side seams and pulled the elastic out on both sides, scrunching the back.
 |
| Pulling out the elastic |
Since I separated the top seam where the drawstrings were, I used that space to lay the extended elastic. I pinned and sewed the edge of the elastic to the edge of the small gap in the center of the piece on both sides.
 |
| Pinned elastic |
Then I pulled more of the elastic out, pinned it in between the flaps, and sewed along the top so the elastic could have its own tunnel of sorts to expand and contract.
 |
| Sewing in the elastic |
 |
| Button hole |
Then I hand-sewed on a yellow button on the other side of the gap.
 |
| Button |
I took some yellow gem buttons I had removed from another shirt and hand-sewed them straight down the front center of the piece about 2 inches apart.
 |
| Gem buttons |
Lastly, the bottom corners still flared out kind of awkwardly, so I sewed in the corners a bit.
Here again is how it looked before:
 |
| Before: Yellow shirt |
And now after:
 |
| After: Yellow skirt |
 |
| After: From behind |
Ideally this skirt could be paired with a light pastel-colored top to feel more Spring-y, but none of my shirts seemed to work just right. Oh well. I still think it looks better as a skirt than a shirt :)
Even though I love the Spring-like weather, I am looking forward to some of those April showers before the Summer heat rolls around!
By the way, don't forget to Spring-forward an hour one week from today. Start adjusting your sleep schedules now!
Until next time, blessings.
Great Pics I Like yellow Its Ow-some shirts thanks For sharing.Cool Port Authority Polo
ReplyDeleteThanks a bunch Martin!
ReplyDelete